Creating an API with Express.js using OpenAPI
Express is a popular backend JavaScript framework for building landing pages and integrated content management systems or integrating APIs with other tools. With over twenty million weekly downloads on npm at the time of writing, the framework’s popularity comes from its ease of setup and use, extensibility with first- and third-party middleware functions, and its flexible built-in router.
OpenAPI is a standard for describing HTTP APIs in a document that humans and computers alike can understand or consume. Building APIs according to the OpenAPI specification can ease friction between an API’s developer and its consumers, especially in terms of how the API should operate. Some knowledge about the OpenAPI specification can definitely help you understand the examples provided.
In this article, you’ll learn how to build REST APIs using Express. You’ll also learn how to document your APIs according to the OpenAPI specification with express-openapi. Finally, you’ll learn how to effectively manage your API documentation using Bump.sh.
Crash Course in Express #
The Express architecture is based around middleware, which are functions that can access and modify the request and response object and either return a response or trigger subsequent middleware functions. Middleware can be registered by invoking the .use() method on an Express application, like so:
import express from 'express';
import middlewareFunction from 'my-middleware-function';

const app = new express();

app.use(middlewareFunction);
Express has three built-in middleware functions for serving static files (express.static, parsing JSON (express.json) and URL-encoded request payloads (express.urlencoded). Together with the Express router, these provide a good starting point for most applications.
The Case for OpenAPI #
The OpenAPI specification is an opinionated, language-agnostic standard for describing HTTP APIs that allows humans and machines to understand and interact with an API without the need to access the source code. A valid OpenAPI description document is also called an API contract because, like a contract, it enforces a specific behavior that must be implemented by the developer and adhered to by the consumer.
An API contract adds value in many ways, including easing the development burden, improving ease of adoption for first-time consumers, and using automated tools to reduce the amount of work needed to generate client code and documentation or validate I/O data.
In the next few sections, we’ll see API contracts in action as we build an Express application and generate documentation with Bump.sh.
Implementing an API with OpenAPI and Express #
In this section, using Express, you’ll build an API that follows the OpenAPI specification. You will be walked through steps to set up an Express application, configure it according to the OpenAPI spec, and see how to view your API documentation.
Prerequisites #
In order to follow along with this tutorial, you’ll need the following:
- Familiarity with JavaScript (and Node.js)
- Node.js
- A Node.js package manager —
npmwas used in this article - A Bump.sh account
You can find the source code for the project in this GitHub repo.
Creating an Express Application #
Let’s start with creating an Express application. As mentioned, one of the reasons Express is so popular is that it’s quick and easy to set up.
First, create a new folder for your project. Spin up a terminal session and run the following command to create a folder named express-oas:
mkdir express-oas
Next, initialize a JavaScript project by adding a package.json file. Using the same terminal session or via your computer’s file manager, create a file named package.json:
cd express-oas
touch package.json
Open the package.json file using a text editor, then copy and paste the following in the file:
{
  "name": "express-oas",
  "main": "index.js",
  "scripts": {},
  "dependencies": {
    "express": "^4.18.2"
  }
}
You can also use npm init or yarn init to automatically generate a package.json file. Both npm init and yarn init (on Yarn Classic) run interactively, meaning that you’ll need to respond to a series of prompts before the file is generated. To skip these prompts and use the defaults, you can run the command with the -y flag:
# Run interactively
npm init

# Run non-interactively
npm init -y
Finally, install the express package dependency from the npm or yarn registry and create your Express application.
In your terminal, run the command to install dependencies:
npm install
Next, create a file named index.js in your project’s root folder. You can do that via the terminal by running the following:
touch index.js
Open this file using your text editor, then import and initialize your Express application:
import express from 'express';

const PORT = 3000;

const app = new express();

app.use(express.json());

app.listen(PORT, () => {
	console.log(`Server running on ${PORT}`);
});
The default export from the express package is a function that, when invoked, creates an express application instance. This instance or object contains methods for routing HTTP requests, configuring middleware, and binding and listening for connections on a specified host and port.
In the code block above, you configured an Express application and registered the json() middleware, which parses incoming requests with JSON payloads and a matching Content-Type header.
If you try to access the application at this stage by running node index.js and navigating to http://localhost:3000 on a web browser, you’ll be greeted by an error. There’s no need to worry about this, however, as it just indicates that there are no routes or logic configured in your application yet. In the next section, we’ll add some logic and set up the application’s documentation with express-openapi, an OpenAPI framework for Express.
Integrating OpenAPI with express-openapi #
For developing APIs, it helps to think of the API as a collection of resources, with each resource represented by a simple object that can be—from the moment of its creation—viewed, modified, or destroyed.
For simplicity, you can use this create, read, update, and delete (CRUD) pattern to help plan or design your API quickly. You can set up an OpenAPI-compliant API in a few steps using the express-openapi package. For this one we will assume that our project has only one resource, called User.
express-openapi is an un-opinionated OpenAPI framework for Express, which supports OpenAPI versions 2.x and 3.0 at the time of writing. Configuration can be done in JavaScript or from a YAML string/file. In this project, you’ll be using a JavaScript object.
express-openapi allows you to keep the OpenAPI definition in sync with the code. Basically, you will provide an OpenAPI definition file with empty paths and they will be populated from your code. Doing this ensures the OpenAPI file will be exactly reflecting how the code behaves, updated as the code is. It also allows you if you go play around with the tool to validate your schemas, automatically provide res.validateResponse tailored to a particular route, helps with your API security management, and so much more I can’t list them all now. The whole purpose of this framework is to stay as close as possible to express while leveraging the power of OpenAPI.
To get started, run this command in your terminal to install the package:
npm install express-openapi
Open the index.js file in your editor and add the following import near the top of the file:
import { initialize } from 'express-openapi';
The initialize import is a function that accepts a configuration object and sets up an OpenAPI-compliant contract that can be viewed or generated for your API. The required configuration parameters are as follows:
- a reference to an Express application
- an
operationsobject containing exposed HTTP methods and handler functions - a
pathsstring that points to a directory where route files can be found - an
apiDocobject describing the API’s base definition, including schemas of objects used in your documentation
Note that either operations or paths will be required at any time. This means that if operations is present, then paths isn’t required and vice versa.
Now make the following changes to the index.js file to see what this config looks like in action.
As first argument, you need to pass a reference to your Express app, then optionally specify a path to the docsPath keyword if you want the API contract file to be served by your server, in development mode this can be useful (as you will see later when using the Bump CLI), however in production mode you might want to remove this and replace it with the exposeApiDocs: false option. Something like:
initialize({
  app,
  docsPath: "/api-definition",
  exposeApiDocs: (ENV["NODE_ENV"] !== "production"),
});
Next, configure the apiDoc object by specifying the path of a file containing the base of your API definition. In this tutorial, you’ll be using OpenAPI 3.1. Add the apiDoc file path to the initialize config object:
initialize({
  // other objects here..
  apiDoc: "./doc/api-definition-base.yml",
})
And create the file ./doc/api-definition-base.yml with the following content:
openapi: "3.1.0"
info:
  title: "A getting started API"
  version: "1.0.0"
servers:
  - url: "/"
paths: {}
components:
  schemas:
    User:
      required: ["name"]
      type: "object"
      properties:
        id:
          type: "string"
          description: "The user's unique identifier"
        name:
          type: "string"
          description: "The user's preferred name"
        email:
          type: "string"
          description: "Email address"
Note that the API definition paths property is an empty object. This is because express-openapi will generate its members based on the value of the paths property given in the initialize function dynamically, which you’ll add next.
To do this, we will import javascript files by adding the folder path or our API endpoints logic to the initialize function call:
initialize({
  // ...
  // rest of code omitted for clarity
  paths: "./paths",
})
Finally, you’ll need to add a route with some operations to complete the express-openapi initialization. The express-openapi package uses filesystem-based routing. Let’s look at the following routes we want to define:
GET /users
PUT /users/:id
They would need the following files to be created (assuming ./ is the starting directory):
./paths/users.js
./paths/users/{id}.js
While we’ll be using more routes, these two files will be enough for what our project needs, so go ahead and create them:
mkdir -p paths/users
cd paths
touch users.js
cd users
touch {id}.js
We’ll add some logic to our API application inside these files. Each file will contain a function as its default export, and this function will act as the corresponding path handler. For example, requests sent to /users will be handled by the function exported in ./paths/users.js, and requests sent to /users/{uniqueId} will be handled by the function exported in ./paths/users/{id}.js.
First, open the users.js file and add the following code:
export default function () {
  let operations = {
    GET,
    POST,
  };

  function GET(req, res, next) {}

  function POST(req, res, next) {}

  GET.apiDoc = {};
  POST.apiDoc = {};

  return operations;
}
Next, add the following code to the users/{id}.js file:
export default function () {
  let operations = {
    GET,
    PUT,
    DELETE,
  };

  function GET(req, res, next) {}

  function PUT(req, res, next) {}

  function DELETE(req, res, next) {}

  GET.apiDoc = {};

  PUT.apiDoc = {};

  DELETE.apiDoc = {};

  return operations;
}
Let’s quickly break down what’s happening in these files:
- You have a function as the default export, and this function returns an object representing valid operations (HTTP methods) for the route.
- As mentioned earlier, the file names correspond to the route that will be matched when your API is queried.
- For each operation defined in the
operationsobject, you need a corresponding handler function, and the function name must match the HTTP verb (PUT, GET, etc). - Finally, the documentation for each handler function can be described by adding an
apiDocproperty to the handler functions.
What’s missing now are: your API documentation and the actual API logic. We’ll add those in the next few steps.
First let’s add your API endpoints documentation. We will update the apiDoc property for the GET and POST handler functions in the users.js file:
// ./paths/users.js
// rest of code hidden for clarity

GET.apiDoc = {
    summary: "Returns list of users",
    operationId: "getUsers",
    responses: {
      200: {
        description: "List of users",
        content: {
          "application/json": {
            schema: {
              type: "array",
              items: {
                $ref: "#/components/schemas/User",
              },
            },
          },
        },
      },
    },
  };
  POST.apiDoc = {
    summary: "Creates a new user",
    operationId: "createUser",
    requestBody: {
      content: {
        "application/json": {
          schema: {
            $ref: "#/components/schemas/User",
          },
        },
      },
    },
    responses: {
      201: {
        description: "Newly created user",
        content: {
          "application/json": {
            schema: {
              $ref: "#/components/schemas/User",
            },
          },
        },
      },
    },
  };

// rest of code hidden for clarity
We’ll also add the documentation for the GET, PUT, and DELETE handler functions in the users/{id}.js file:
// ./paths/users/{id}.js
// rest of code hidden for clarity

GET.apiDoc = {
    summary: "Returns a single user",
    operationId: "getOneUser",
    parameters: [
      {
        name: "id",
        in: "path",
        required: true,
        schema: {
          type: "string",
        },
      },
    ],
    responses: {
      200: {
        description: "User data",
        content: {
          "application/json": {
            schema: {
              $ref: "#/components/schemas/User",
            },
          },
        },
      },
    },
  };

  PUT.apiDoc = {
    summary: "Updates an existing user",
    operationId: "updateUser",
    parameters: [
      {
        name: "id",
        in: "path",
        schema: {
          type: "string",
        },
        required: true,
      },
    ],
    requestBody: {
      content: {
        "application/json": {
          schema: {
            $ref: "#/components/schemas/User",
          },
        },
      },
    },
    responses: {
      200: {
        description: "Updated user",
        content: {
          "application/json": {
            schema: {
              $ref: "#/components/schemas/User",
            },
          },
        },
      },
    },
  };

  DELETE.apiDoc = {
    summary: "Deletes an existing user",
    operationId: "deleteUser",
    parameters: [
      {
        name: "id",
        in: "path",
        required: true,
        schema: {
          type: "string",
        },
      },
    ],
    responses: {
      204: {
        description: "No content",
        content: {},
      },
    },
  };
The apiDoc property of a function handler defines the OpenAPI documentation for that endpoint while the summary and operationId fields provide a brief description and a unique identifier, respectively. Route parameters and the required format for the request body data can be configured with the parameters and requestBody fields, respectively. Finally, the responses field provides information about the possible responses—and their status codes—for an endpoint.
Next, update the function handlers to include CRUD logic:
// ./paths/users.js

// rest of code hidden for clarity

function GET(req, res, next) {
  res.status(200).json(mockDatabaseInstance.getAll());
}

function POST(req, res, next) {
  const data = req.body;
  mockDatabaseInstance.addUser(data);
  res.status(201).json(mockDatabaseInstance.getAll());
}
The GET and POST function handlers here respond to GET and POST requests made to /users, respectively. The GET function retrieves all user data from a database, the mockDatabaseInstance—which we’ll get to later—and returns it in JSON format with a status code of 200. The POST function adds a new user to the database from data provided via the request’s body and returns the updated user list with a status code of 201.
We’ll also need to update the function handlers in the /users/{id}.js file. Open the file and update the GET, PUT, and DELETE functions to include the following code:
// ./paths/users/{id}.js
// rest of code hidden for clarity

function GET(req, res, next) {
  const user = mockDatabaseInstance.getOne(req.params.id);
  res.status(200).json(user);
}

function PUT(req, res, next) {
  const data = req.body;
  const updatedUser = mockDatabaseInstance.updateUser(req.params.id, data);
  res.status(200).json(updatedUser);
}

function DELETE(req, res, next) {
  mockDatabaseInstance.deleteUser(req.params.id);
  res.status(204).send();
}
As mentioned earlier, requests made to /users/someUniqueId will be routed to this file and handled according to their HTTP verbs. The GET function here retrieves a single user from the database, matching the ID provided in the request’s path. The PUT function updates a single user, also matching the provided ID, and returns the updated user as JSON with a status code of 200. The DELETE function removes a user from the database using the ID provided in the request. No data is returned from the DELETE function, so the status code is 204.
The mockDatabaseInstance object referenced in the function handlers code is a simple object with methods for updating and reading from an in-memory data store (an array of objects). We can add this to our project by creating a file named database.js in the project root:
touch database.js
And adding the following code to the file:
function mockDatabase() {
  const dataStore = [];

  function userExists(id) {
    return dataStore.findIndex((value) => value.id === id) !== -1;
  }

  function addUser(data) {
    if (userExists(data.id)) {
      // user already exists, let's throw an error
      throw new Error("User already exists.");
    }
    dataStore.push(data);
  }

  function updateUser(id, data) {
    if (!userExists(id)) {
      // user does not exist, let's throw an error
      throw new Error(`No user with ID ${id} was found`);
    }
    const index = dataStore.findIndex((value) => value.id === id);
    const updatedUser = {
      ...dataStore[index],
      ...data,
      id,
    };
    dataStore.splice(index, 1, updatedUser);
    return updatedUser;
  }

  function deleteUser(id) {
    if (!userExists(id)) {
      // user does not exist, let's throw an error
      throw new Error(`No user with ID ${id} was found`);
    }
    dataStore.splice(
      dataStore.findIndex((value) => value.id === id),
      1
    );
  }

  function getAll() {
    return dataStore;
  }

  function getOne(id) {
    if (!userExists(id)) {
      // user does not exist, let's throw an error
      throw new Error(`No user with ID ${id} was found`);
    }
    return dataStore.find((value) => value.id === id);
  }

  return {
    addUser,
    updateUser,
    deleteUser,
    getAll,
    getOne,
  };
}

const mockDatabaseInstance = mockDatabase();

export default mockDatabaseInstance;
The code above defines a function named mockDatabase that returns an object with multiple functions to perform CRUD operations on an in-memory data store, the dataStore array. The functions addUser, updateUser, and deleteUser respectively perform operations to add, update, or delete users from the data store. The getOne and getAll functions retrieve one or multiple users from the data store, while userExists is a utility function for checking if a user with a matching ID exists in the data store.
We instantiate and store the mockDatabase in the mockDatabaseInstance variable, and we export and use this in our function handlers. Let’s update the rest of our code to include the mockDatabaseInstance import.
Open the files in your paths directory, and add the following line at the top of each file:
import mockDatabaseInstance from "../database.js";
Note that for the paths/users/{id}.js file, you need to add two dots and a slash (../) as it’s nested one level deep:
import mockDatabaseInstance from "../../database.js";
With that, your API and its contract have been set up. When you test your application in the next section, you’ll see that errors will be thrown for invalid requests or payloads that don’t conform to the documentation you’ve described. This is where the express-openapi library shines as you didn’t need to define any validation code but the provided documentation schemas and constraints will do all the job for you.
While you’ve learned to create an Express application with express-openapi in this section, it’s been light on information about the OpenAPI specification and the express-openapi package. You can start with the OpenAPI guide if you’d like to learn more about the OpenAPI specification and the express-openapi documentation for more information on how to use the package.
Running and Testing the Application #
It’s time to run and test the application. Simply run node index.js and navigate to http://localhost:3000/api-definition in a browser to see your API definition.
You can also test the API by visiting http://localhost:3000/users to list the users in your database.
In a production environment, you will probably want to deploy the updated API definition each time you make a change in your code without having to expose the API definition on your express server.
To do so, copy the following script into a new file named contract.js:
import OpenAPIFramework from "openapi-framework";

// Use OpenAPIFramework similarly than in the express-openapi library
// to generate the OpenAPI definition file of our API
const framework = new OpenAPIFramework.default({
  featureType: 'middleware',
  name: "express-openapi",
  apiDoc: './doc/api-definition-base.yml',
  paths: "./paths"
});
await framework.initialize({});

// Output OpenAPI definition
console.log(JSON.stringify(framework.apiDoc))
This is a simple script which uses the express-openapi package to generate the API definition file without the need to run an Express server.
So if you run the following command:
node contract.js > doc/api-definition.json
You will be able to snapshot the current OpenAPI definition file inside the doc/api-definition.json file.
Using Bump.sh for Documenting Your Express APIs #
Using OpenAPI (and the express-openapi package) enables you to use API contracts that make collaboration easy among developers when building and integrating with APIs. However, manually generating and maintaining these contracts can be tough, as you just saw. Bump.sh can improve this collaboration by helping documenting your API based on the contract.
As an API documentation management solution, Bump.sh helps publish API contracts into developer portals, track changes, and alert teams when breaking changes are introduced. It essentially eases the workload of manually updating your API’s documentation, communicating changes made to your API’s consumers, and keeping track of all your product documentation.
Bump.sh provides a command line interface (CLI) tool that lets you easily preview your API documentation while it’s in development (with support for live reloading), deploy versions of your documentation automatically from your CI build step, compare changes made between versions of your API, as well as notify consumers of changes made to your APIs.
Configure Bump.sh for Express Applications #
To configure Bump.sh for your Express app, you need to add the Bump.sh CLI to your existing Express project:
npm install bump-cli
As mentioned, bump-cli can be used to preview, compare versions, or deploy new versions of your API documentation.
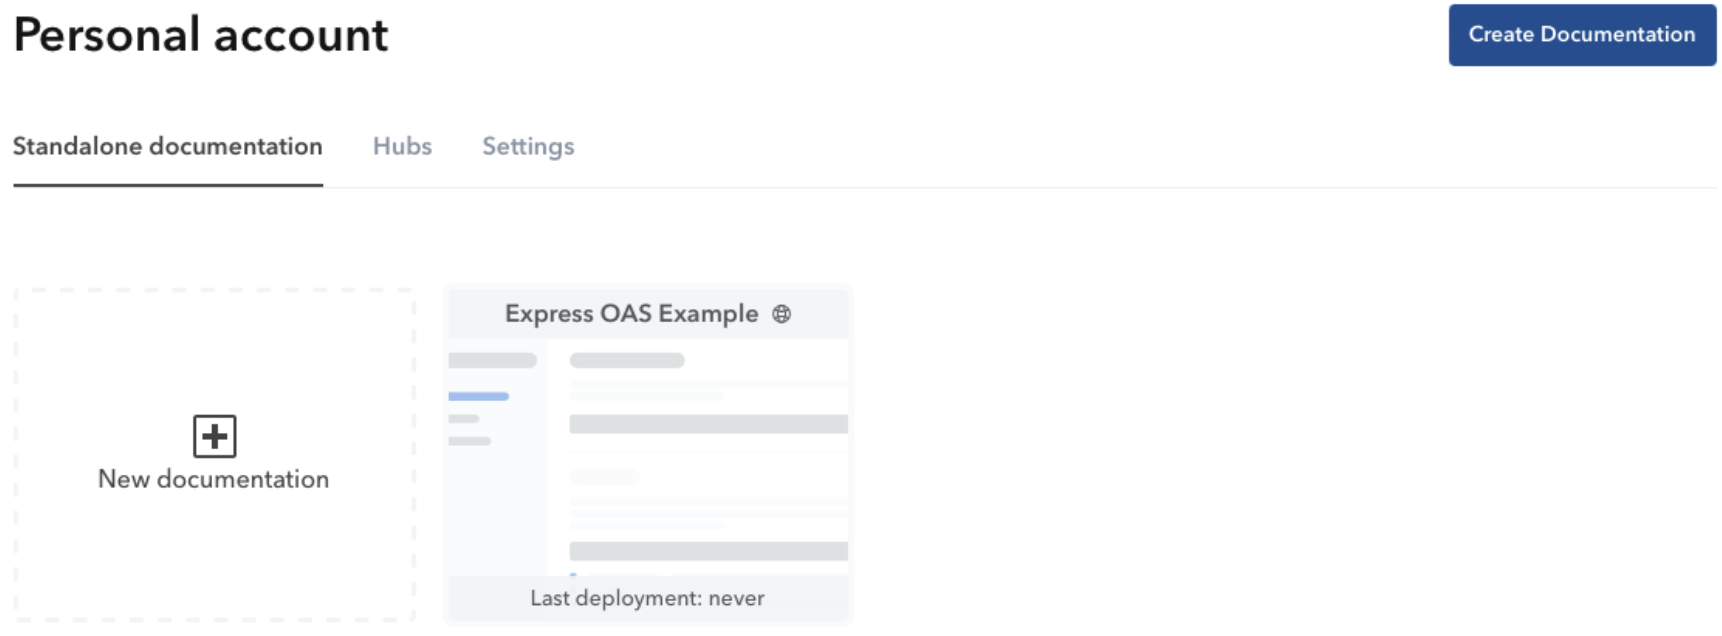
Sign up or login in your Bump.sh account. You can begin by navigating to your dashboard and clicking Create Documentation.
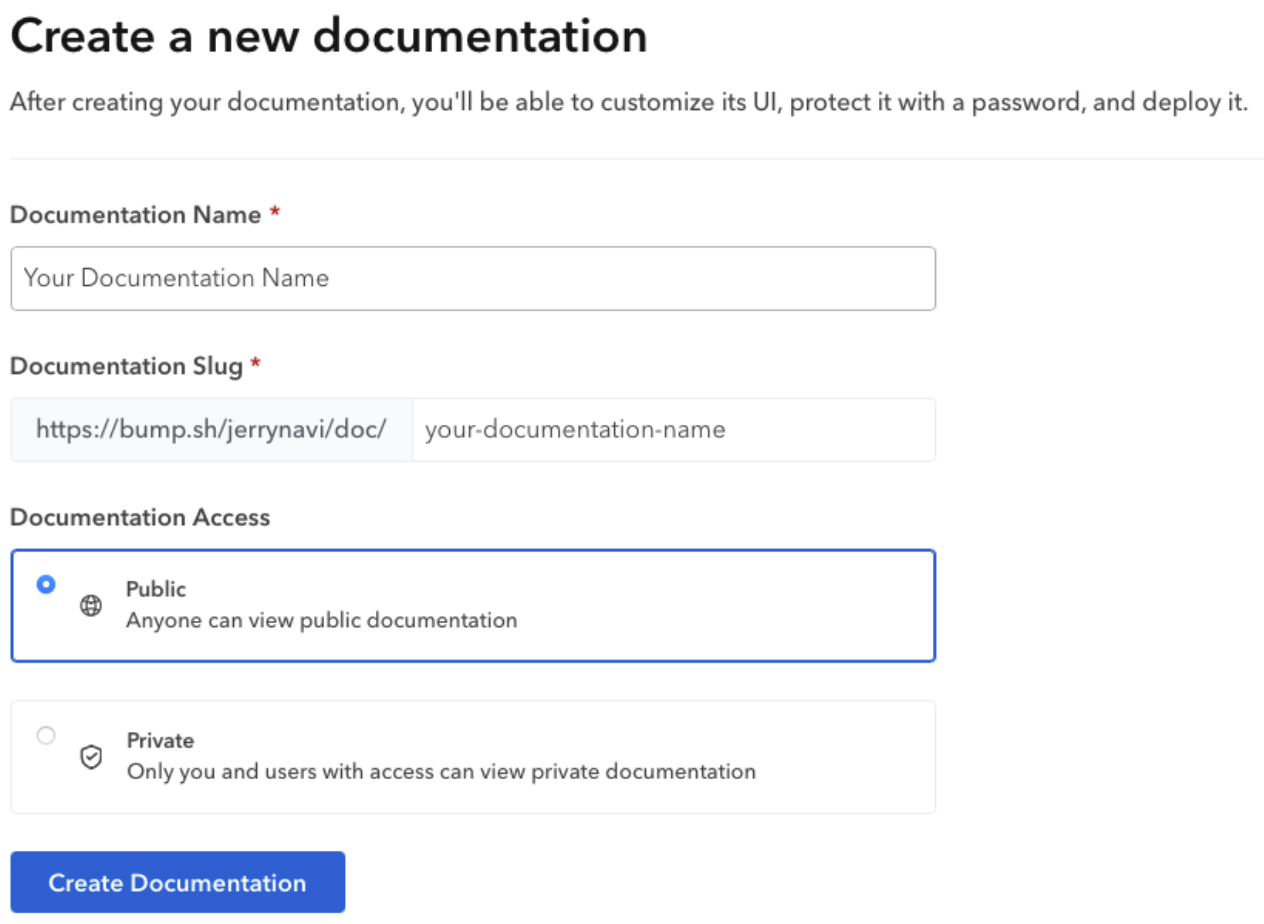
Next, add your documentation’s name and, optionally, specify its access level (public or private).
Next, you’ll be asked to upload a specification file. Choose the Use Bump.sh CLI option, which will immediately take you to the newly created documentation’s deployment configuration page. Here, you’ll find the token that’s required to deploy your documentation using the CLI. It’s the string labeled Access token, as shown below.
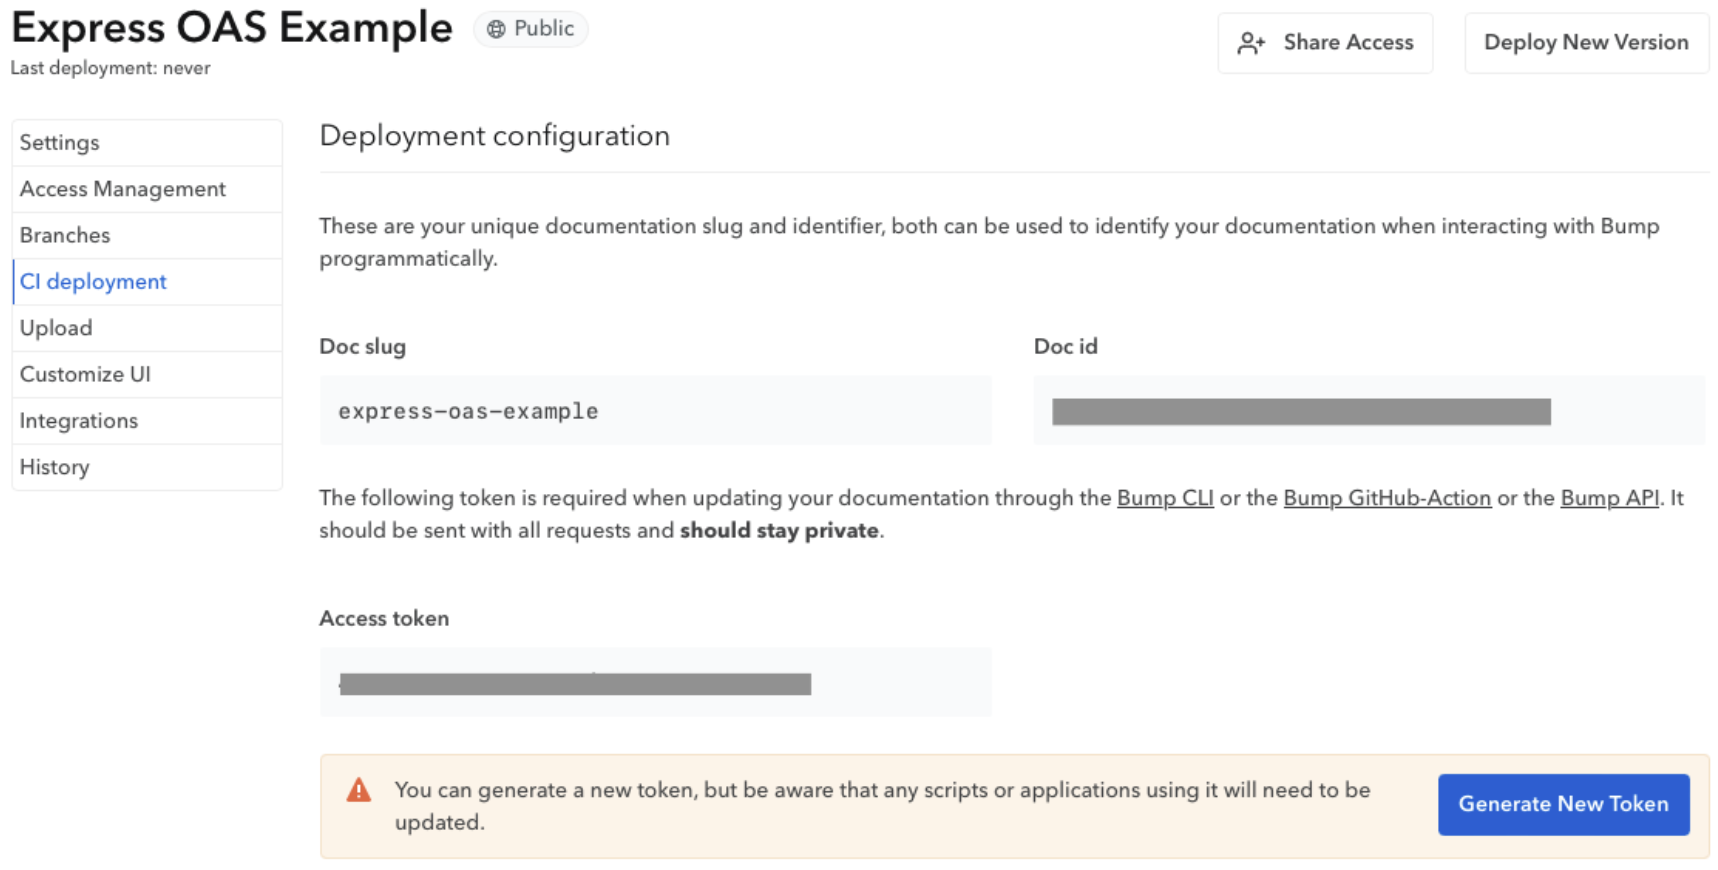
Copy this token and replace YOUR_TOKEN with it when running the command to deploy your project:
npx bump deploy http://localhost:3000/api-definition --doc YOUR_DOCUMENTATION_SLUG --token YOUR_TOKEN
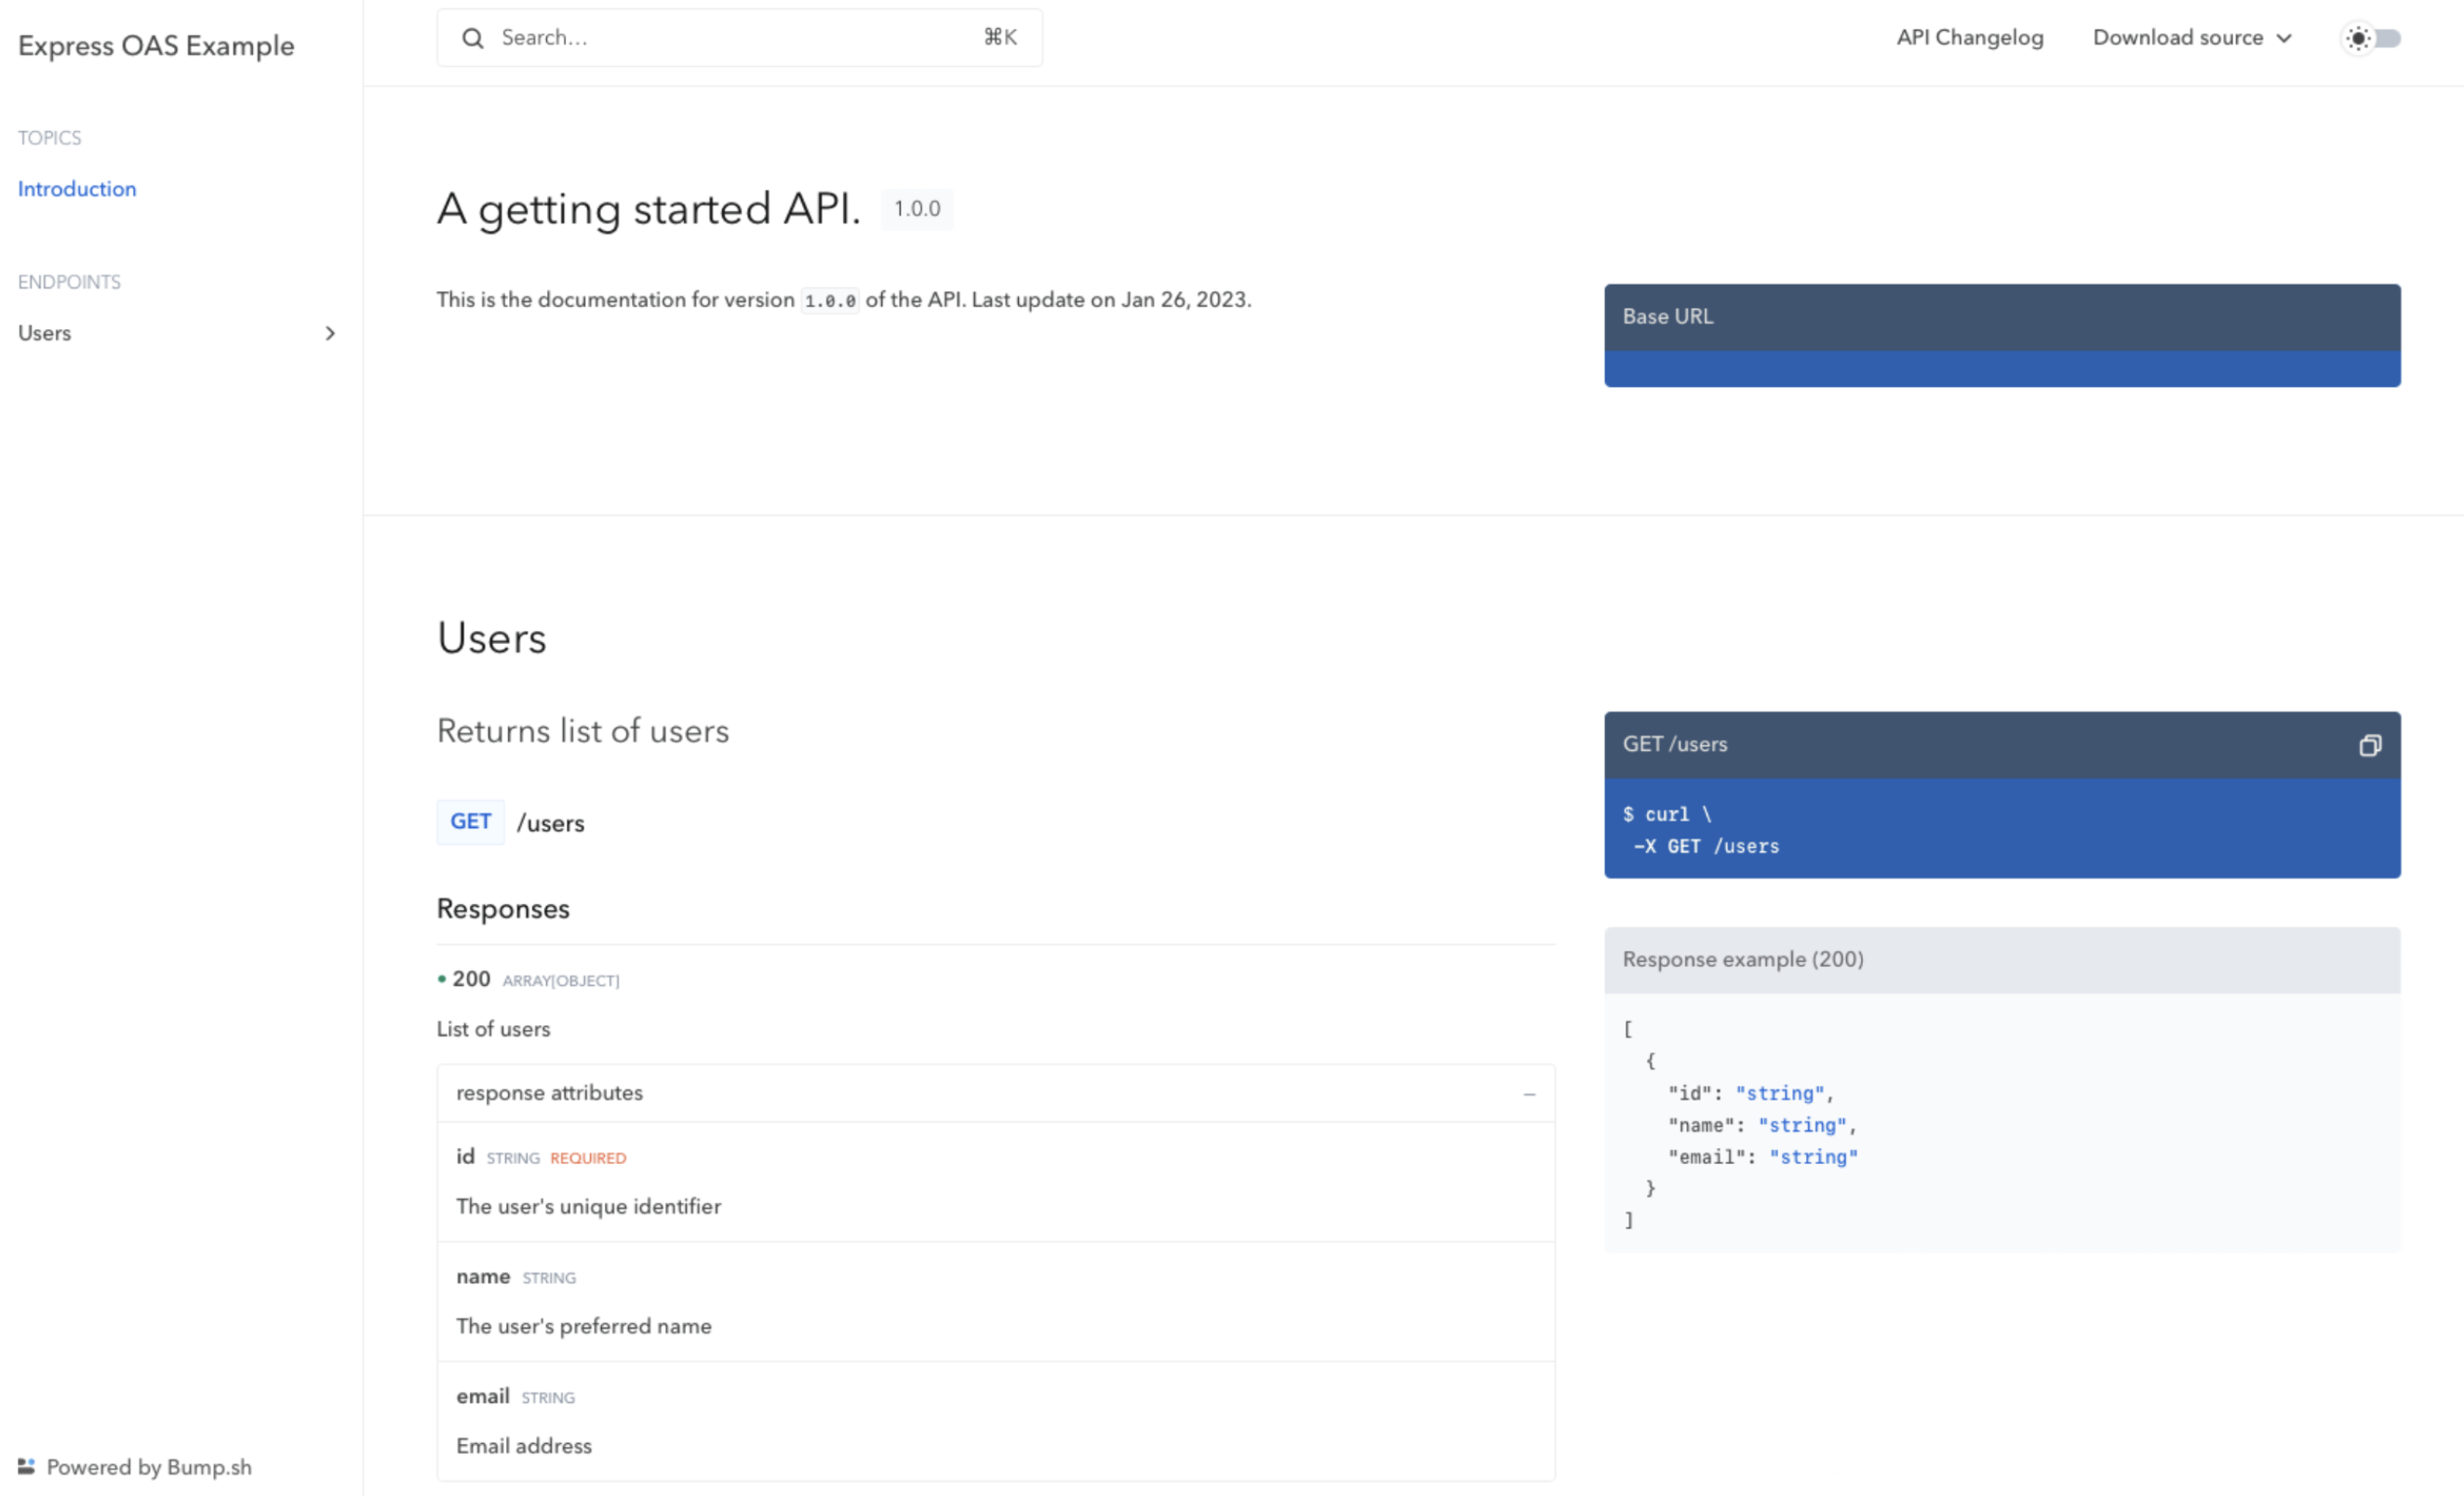
Running the command above will trigger a deployment that you can view by clicking View Documentation from your documentation’s General Settings page.

Your deployed documentation should open in a new tab, and it should look like this:
Automate API documentation update with Bump.sh #
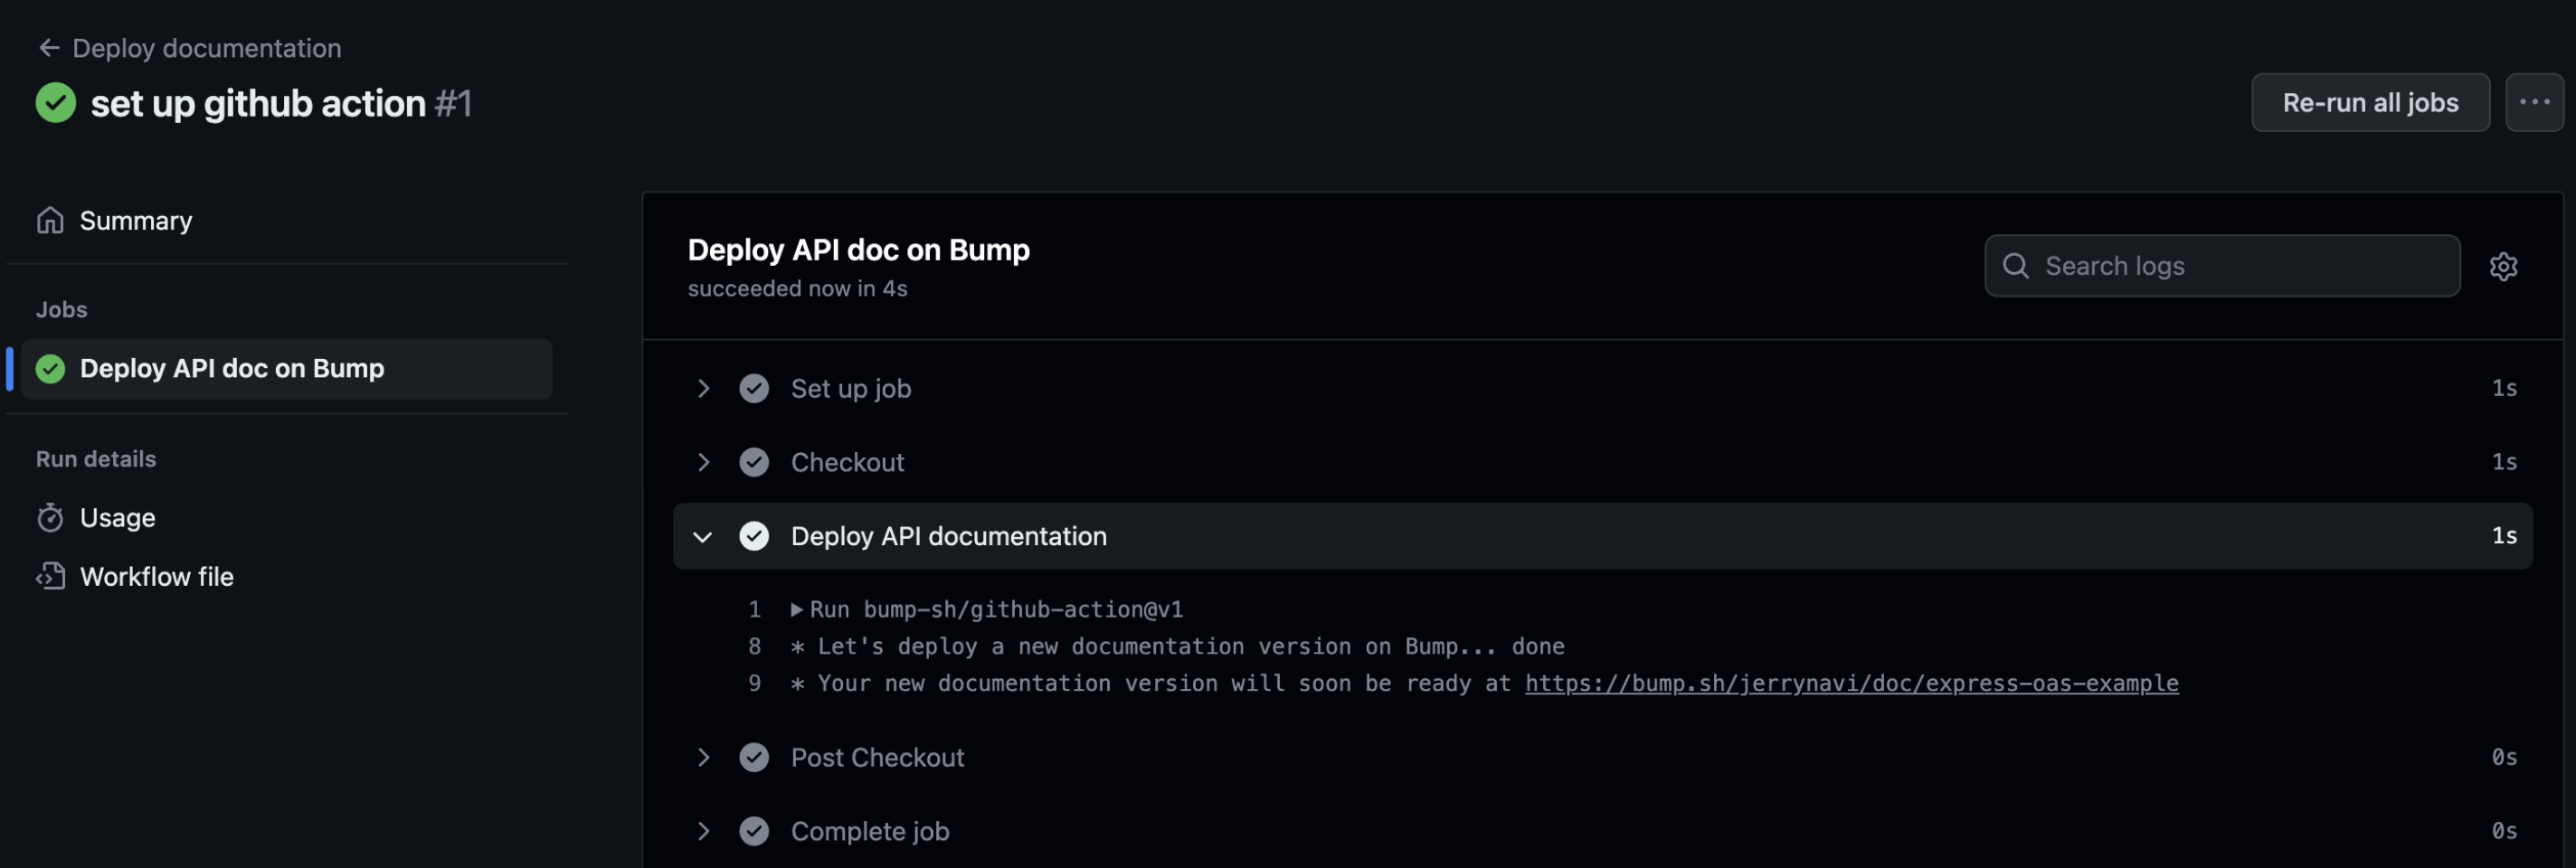
In order to automatically deploy a new version of your documentation every time you push code changes to a branch, we will add the Bump Github Action to your repository.
To deploy a new version on each push, create a file named bump-deploy.yml in the .github/workflows folder of your project, then paste the following code into the file:
name: Deploy documentation

on:
  push:
    branches:
      - main

jobs:
  deploy-doc:
    name: Deploy API doc on Bump
    runs-on: ubuntu-latest
    steps:
      - name: Checkout
        uses: actions/checkout@v3
      - name: Install NodeJS
        uses: actions/setup-node@v3
        with:
          node-version: 18
      - name: Install node dependencies
        run: npm ci
      - name: Generate OpenAPI contract
        run: node contract.js > doc/api-definition.json
      - name: Deploy API documentation
        uses: bump-sh/github-action@v1
        with:
          doc: <BUMP_DOC_ID>
          token: ${{secrets.BUMP_TOKEN}}
          file: doc/api-definition.json
This workflow runs every time git push is run on the main branch. It will generate the API definition thanks to the contract.js script, then deploy the API definition file to Bump.sh thanks to the Bump Github Action.
Just make sure you provide your Bump documentation slug (replace the <BUMP_DOC_ID> value) and an encrypted secret containing the Bump access token used earlier in a BUMP_TOKEN secret variable on your repository.
The resulting action should run on each push to the main branch:
Your API consumers can then subscribe to changes made to your API by clicking on API Changelog from your API documentation page. Either by completing the form or adding the RSS feed link to apps that can display RSS feeds.

Conclusion #
By following this tutorial, you created an Express application and documented the API according to the OpenAPI specification with the express-openapi npm package. You also learnt how to deploy a live version of your API documentation using Bump.sh.
Documenting your APIs correctly is key to your API quality, usability, maintainability and helps your API consumers quickly get up to speed with using your product, reducing the number of support tickets and issues related to consuming your API.
Bump.sh helps with documenting your APIs but goes one step further by giving you tools like an automatic API changelog with notifications and diffs and a hub to manage all your API documentation in one place.
